What else is there to write about?
There are probably websites that you read regularly, to check for breaking news, and other interesting topics. It'd be nice if you could find a way to bring all of these disparate webpages together. It'd be even nicer if by bringing these things together, you could find more topics to write about.
An RSS feed combined with a feed reader can accomplish these wishes.
Every website contains content, which is why you'd visit. In order to see if the site contained new content, you'd have to type the address or click a bookmark. Even then, there's no guarantee that the site would have been updated in which case, it'd be a waste of time.
An RSS reader (like Bloglines) collects your favorite websites and displays their content on a single page, while notifying you when new articles are updated. An RSS feed is a website's announcement that new content has been posted. It's received by the RSS reader and from there you can read the new materials. This saves you the effort of regularly visiting your favorite blogs or sites. For breaking news, though, it's easier to go directly to the news source since feed readers are usually updated at intervals.
Bloglines is a web-based RSS reader that's easy to use and doesn't require a download. It can also be accessed from any computer.
1. The sign-up process is fairly standard, and begins in the center of the Bloglines page.
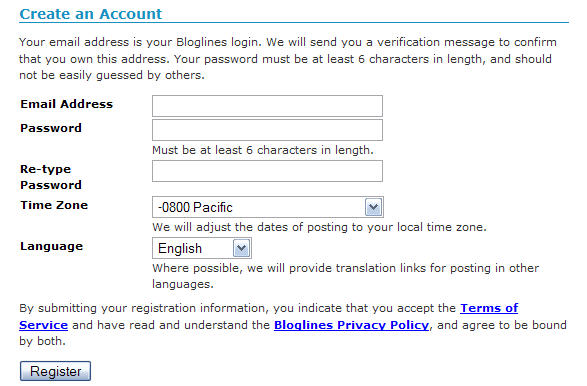
2. After you you provide your email, and password, you'll be asked to confirm that your email address is yours and is valid. Wait for the Bloglines site to email you, click the link in the email they send, and then Bloglines knows that your email address is yours. (Sometimes, people will sign up for different free webservices using someone else's email address in hopes that that address will be spammed. This is a polite way around that practice.)
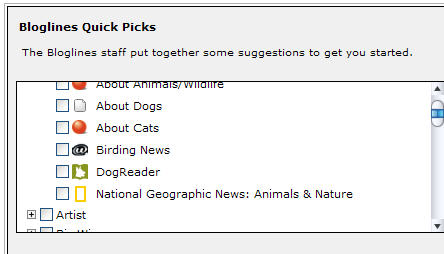
3. Under the welcome box after you confirm your registration, you'll see two boxes on the right hand side of the screen. Of the two boxes, the box on the left is where we'll start. This is the Quick Picks box, and Bloglines has sorted a few popular feeds into categories. Click on the Plus sign to expland the category, allowing you to see each blog within that category, or click on the check box to subscribe to every blog within that category.
Bloglines uses the subscribe/unsubscribe terminology for deciding that you want to be notified that a website's been updated.
Select as many of the interesting websites as you want, but know that each of these sites will likely update more than once a day with multiple articles. This can lead to a very large selection of things to read once you're using Bloglines fully! I'd advise to select no more than 10 feeds until you're more familiar with the way things work.
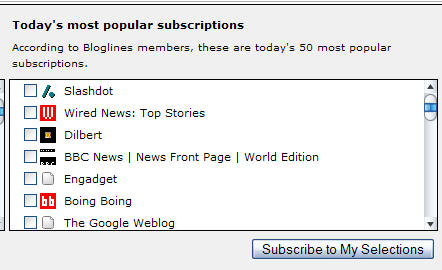
4. The selections you made from the left box will be selected in the right box, which is a collection of the most popular feeds from that day. Select the feeds you're most interested in, and then click Subscribe to My Selections.
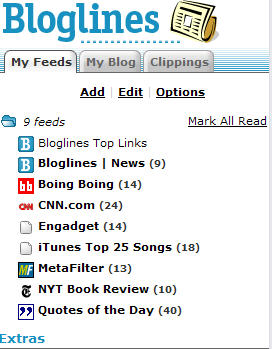
5. This is your feed list. The folder at the top tells you how many feeds you're subscribed to, and offers the handy Mark All Read option in case you get overwhelmed with unread articles.
Notice that all the links are in bold with a number behind them. The bold shows that the feed has been updated since the last time you checked. The number refers to how many articles exist in the feed. (At first, Bloglines will provide you with a great many articles from your selected feeds, because it assumes that you'll want to read past articles as well.)
6. Click on a link to see the articles display in the right hand pane of the screen. This is where your articles will be displayed, and you'll always have access to the Bloglines menus on the left pane.
Now you have a list of the articles available for you to read, distinguished by alternating grey and white shading. At the bottom of each article, the same information appears: the dates show when the article was posted, when Bloglines added the article (under updated), and provides you with options to email, clip, or blog the article. The Keep New check box allows the checked article to be displayed every time that you click on the feed name. (I've had problems with the items displaying reliably, so it's recommended that you email the articles that you're most interested in.)
This article is about the top songs on iTunes, and shows a number of links within the article. Not every article will be displayed fully in Bloglines - some are designed to just show up incompletely on any feed reader, and you'll have to click on the article's title link to read the rest of the article on a separate page.
This article is complete, but if you want more information on the band displayed, you can click on any of the provided links to see a separate page.
In essence, Bloglines acts as a ringmaster for the great Internet circus. It's a way to organize and view the pages that you like best from the chaos.

7. You can add more content by clicking the Add button from the top left pane of your feeds list. Once you're there, the right hand pane will show a number of options. Bloglines will try to find the feed for you if you're unable. A growing number of websites display some kind of badge showing that they're providing an RSS feed. Some even have a little button saying Bloglines, so you'd only have to find and click that link to add their website to your Bloglines feeds. Other sites provide a link showing where their feed's located. Enter this address into the Blog or Feed URL space.
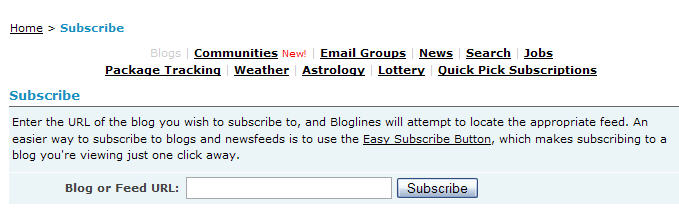
Once you've entered the address, Bloglines will (try to) find the feed for you. If it does, you'll be presented with this screen. Don't worry about what it means - just preview the feed with the link underneath, and if you like it, subscribe to that particular feed with the subscribe button on the bottom. If the feed has a lot of different variations, you may be scrolling for a minute.
The standard settings are: folder - toplevel, updated items - display as new, and display preferences - default. These are good to leave as they are.

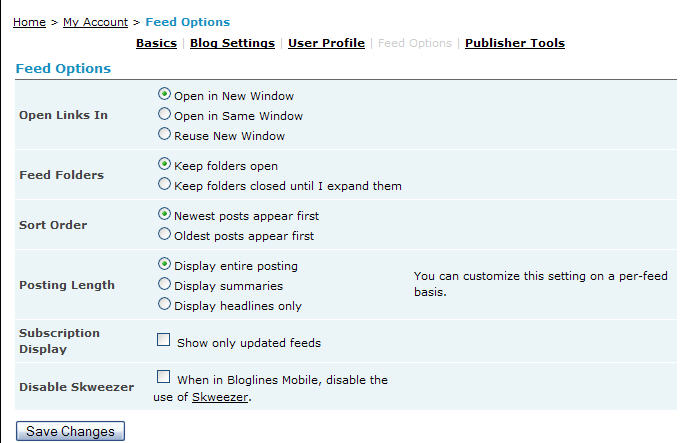
8. Now, go to the Options link in the top right of your screen. Here, you're able to change your account settings. In the basics tab, you can change your email address and password. The blog settings will allow you to set up a blog with your saved articles, but that's not as useful since you've already created a blog. The user profile link will allow you to fill in completely optional information about yourself. The feed options link is the one that you want to check. The settings should be defaulted to these, but feel free to experiment with these settings. I've found that these display articles in a pleasing and helpful way.
Get creative! (Just remember what settings you used so you can revert back to them, if necessary.) If you get overwhelmed with posts, you can always unsubscribe from the feed.
No comments:
Post a Comment