To continue our exploration of interesting sites to browse, we're going to touch upon Technorati, Lifehacker, and Wikipedia, each of which offers a great selection of new ideas and fun.
Technorati is a collection of blogs. Think of it as a del.icio.us for blogs, showcasing popular and much-discussed ideas. It provides a measurement of different popular blogs and articles.
There are a number of categories of interest - the favorites:
top favorited blogs (those blogs added as favorites to Technorati accounts)
top searches and tags
top blogs
popular internet videos
top news
top books.
Any of these categories could provide inspirations for blog postings, tags to use, new things to read, and the internet videos category provides a useful way to see what's popular on YouTube without being deluged with videos.
This site is aimed for serious bloggers, but is fun to skim through in search of new content as well. Again, searching for specifics can be difficult.
For more browsing fun, Lifehacker is a fun, and informative site. It's useful to find random facts, and it's a good addition to a Bloglines account. The content tends to be aimed at computer users with advanced understandings of Linux and operating systems, but it can offer tips for the casual computer user too.
The whole focus of the site is to make life, and computers, easier to use (which is where the site's name originates). The content varies wildly from offering screenshots of yet-to-be-released products, shortcuts to avoid voicemail greetings, to a way to easily scroll through Firefox tabs.
The site draws upon other popular tech blogs, but manages to keep their content interesting and (mostly) accessible to anyone, with the exception of some of the software and hardware "hacks." (This site defines hacks as anything that's done in an unconventional, and not necessarily detrimental, way. The example of faster movement through Firefox tabs would be considered a hack because it's useful.)
Wikipedia is another widely known site offering just about every subject imaginable. It's also often controversial since anyone can edit content on the site, which means that incorrect facts can be posted. If you're curious about both sides of the debate, Wikipedia's coverage of itself (search for Wikipedia) is fascinating to read. The article goes into far more depth than the average user might want to know, but it's still informative.
This site is a great starting point for information-gathering on nearly any subject. But, beware, the content tends to be quoted and requoted verbatim on other sites. You might have to search for an alternative means of verification if you're researching a topic.
Undoubtedly, this site is the definitive resource available online.
Monday, October 30, 2006
Sunday, October 29, 2006
Part II: YouTube
YouTube is probably one of the most talked about websites in existence now. After its acquisition earlier this month by Google, it's received a tremendous amount of media attention. YouTube is a collection of videos uploaded by...anybody. There's a dizzying amount of content available from people singing along to their favorite songs (often badly) to videos of pet tricks. Of course, there are scores of videos featuring teenagers talking at the camera.
YouTube has also been the place to view clips from popular tv shows, although (although copyrighted materials are being removed presently.)
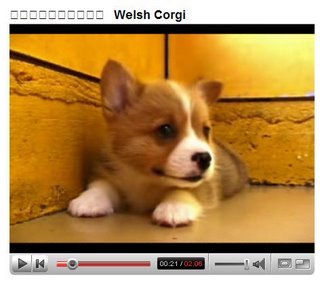
This clip of a Welsh Corgi is popular, and contains nothing more than two minutes of a puppy walking around.
YouTube separates its content into categories, but since the videos are tagged by the people uploading their videos, it's not always helpful. Consider the categories suggestions instead of actual, definitive categories.
This appeared in the Science & Technology category.
Rube Goldberg S'more Machine
inside of hard drive
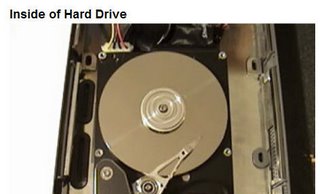
Different movements of the hard drive are shown as different actions are taken. It might satisfy a curiosity that you didn't even know existed. YouTube is good for that.
According to an article in Forbes, teenagers aren't the only ones using YouTube. Adults can even entertain and amuse themselves on the site with a lot of patient browsing.
YouTube has also been the place to view clips from popular tv shows, although (although copyrighted materials are being removed presently.)
This clip of a Welsh Corgi is popular, and contains nothing more than two minutes of a puppy walking around.

YouTube separates its content into categories, but since the videos are tagged by the people uploading their videos, it's not always helpful. Consider the categories suggestions instead of actual, definitive categories.
This appeared in the Science & Technology category.
Rube Goldberg S'more Machine
inside of hard drive

Different movements of the hard drive are shown as different actions are taken. It might satisfy a curiosity that you didn't even know existed. YouTube is good for that.
According to an article in Forbes, teenagers aren't the only ones using YouTube. Adults can even entertain and amuse themselves on the site with a lot of patient browsing.
Part I: del.icio.us
If you see a site you like, or a webpage that you want to revisit, it's probably automatic that you bookmark it. If you want to organize your bookmarks, it's time to break out the folders, and subfolders, and subfolders of subfolders, until your saved items are hopelessly lost in the efficient filing structure. Sound familiar?
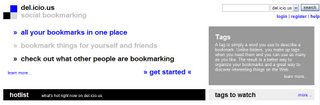
Del.icio.us provides a clever online solution to the tangled bookmark problem. It takes the same concept of bookmarks and adds a social element. Bookmarks are publically viewable (if you'd prefer) and accessible from any computer with internet access. Instead of a labyrinthian tangle of folders, each site or article can be given a tag, which is a short label about the contents.
If you had an article saved on reducing credit card debt, you might tag it as: financial, debt, credit card, budget, to-do. In fact, with del.icio.us, you can tag it with all of those labels and see what other people have tagged the same article with. Then, when you're trying to access that article again, you can use the tag as a trigger for your memory. You can even click on a specific tag, and bring up every article and bookmark that you've associated with that tag.
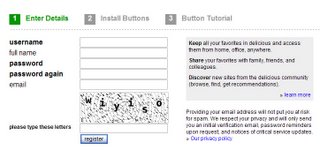
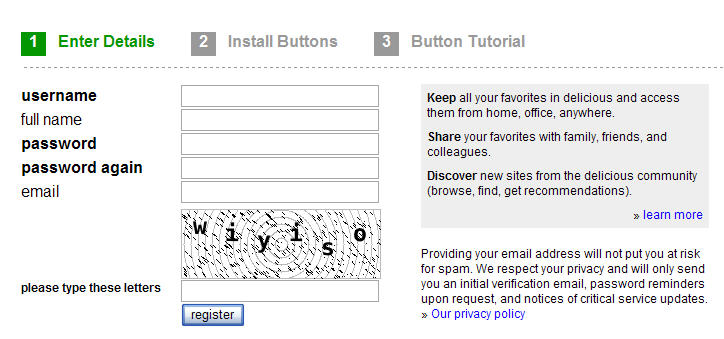
1. From the del.icio.us home page, click on the get started link as shown below. Their explanation of tags in on the right hand side of the page.
2. You'll be taken to a series of registration screens. Feel free to use a pseudonym on the name section. You will be required to verify your email, and opening your Gmail account now would be wise.
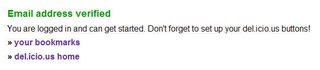
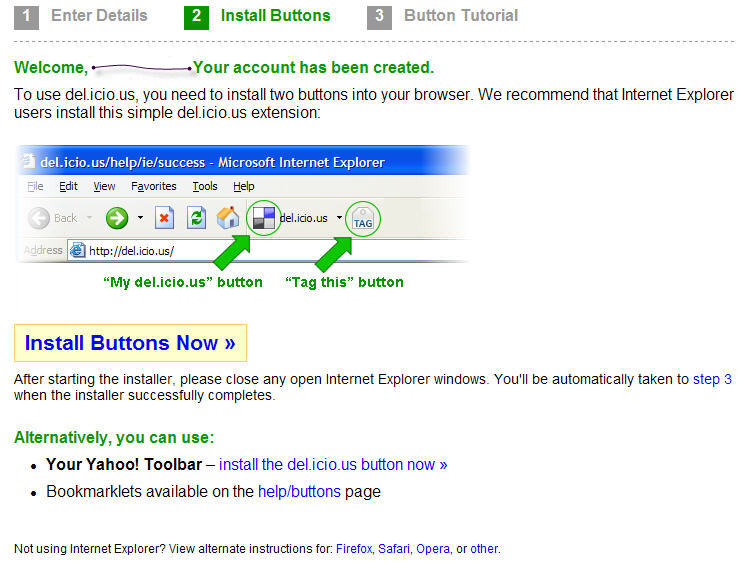
3. After you've verified your email address by opening the email del.icio.us sent, and clicking on the appropriate link, your account is created.
To use del.icio.us, you'll need to install two buttons into your browser. If you're using IE, the first link is the one to click on, and click Run when prompted. (I left my browser open while installing, and nothing dire happened.)
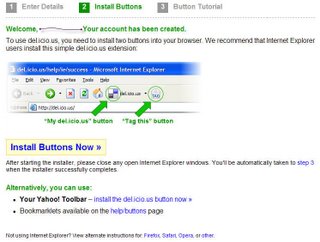
4. This is what the installed buttons look like with Internet Explorer 7. They're positioned slightly differently than the del.icio.us tutorial shows with Internet Explorer 6.

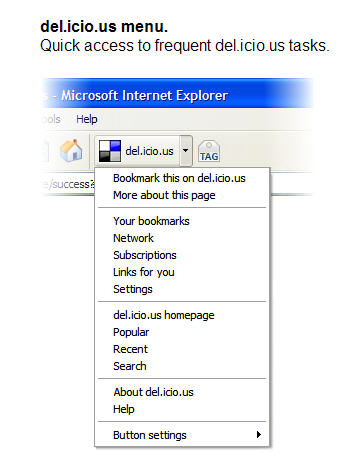
5. The button tutorial is very helpful.
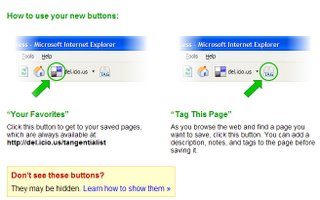
6. If you prefer to use the mouse and right click instead of clicking on a button, you have that option.

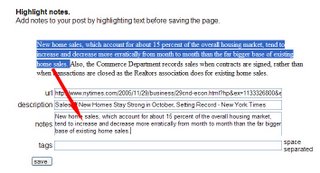
7. To accomplish the notes taken directly from the article as shown on the tutorial, select the text you want, and THEN click on the tag button. Your selected text will automatically appear in the notes section. (If you forgot to select text before you hit the button, you can always copy and paste text into the notes section.)
8. If you have lots of time to while away, click on the popular section under the del.icio.us homepage. You'll be able to see the articles that people are saving, and what kind of tags they're using. It's a fascinating way to learn all kinds of random facts.
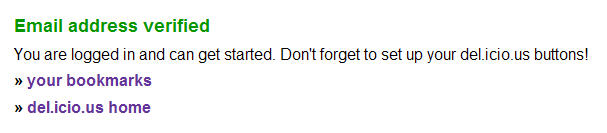
9. Now your email's verified, you're ready to start.
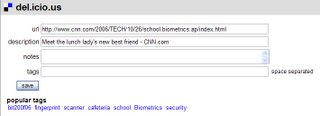
10. After finding an article that you want to bookmark, click the Tag button, and a new tab will appear.
11. The new tab will show the url (web address) of the article you've selected, the description (which is the title of the article), any notes that you want to add, and tags. Separate the tags by a space. The blue links at the bottom show tags created by other people that might be relevant. Click on one of these if you'd like to apply the tag to your tags.
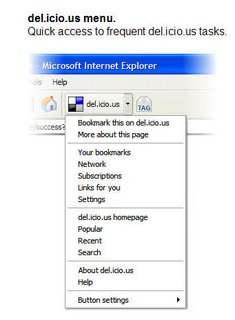
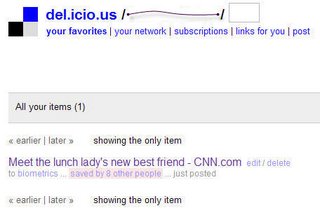
Now, you've created your first del.icio.us bookmark. Click on the checkboard button (on your browser) to return to the homepage.
12. You'll see your homepage with your recently added article. You can edit or delete the article's information or bookmark by clicking on the edit/delete to the right of the article's title.
It's worth remembering that you might have your bookmarks neatly organized, but sometimes online content has a finite life online. Bookmarks do become obsolete, and if you positively cannot live without a piece of information, consider printing it out or copy/pasting the text (with proper references of course) into Word or other word processing program.
Del.icio.us provides a clever online solution to the tangled bookmark problem. It takes the same concept of bookmarks and adds a social element. Bookmarks are publically viewable (if you'd prefer) and accessible from any computer with internet access. Instead of a labyrinthian tangle of folders, each site or article can be given a tag, which is a short label about the contents.
If you had an article saved on reducing credit card debt, you might tag it as: financial, debt, credit card, budget, to-do. In fact, with del.icio.us, you can tag it with all of those labels and see what other people have tagged the same article with. Then, when you're trying to access that article again, you can use the tag as a trigger for your memory. You can even click on a specific tag, and bring up every article and bookmark that you've associated with that tag.
1. From the del.icio.us home page, click on the get started link as shown below. Their explanation of tags in on the right hand side of the page.

2. You'll be taken to a series of registration screens. Feel free to use a pseudonym on the name section. You will be required to verify your email, and opening your Gmail account now would be wise.
3. After you've verified your email address by opening the email del.icio.us sent, and clicking on the appropriate link, your account is created.
To use del.icio.us, you'll need to install two buttons into your browser. If you're using IE, the first link is the one to click on, and click Run when prompted. (I left my browser open while installing, and nothing dire happened.)
4. This is what the installed buttons look like with Internet Explorer 7. They're positioned slightly differently than the del.icio.us tutorial shows with Internet Explorer 6.

5. The button tutorial is very helpful.

6. If you prefer to use the mouse and right click instead of clicking on a button, you have that option.

7. To accomplish the notes taken directly from the article as shown on the tutorial, select the text you want, and THEN click on the tag button. Your selected text will automatically appear in the notes section. (If you forgot to select text before you hit the button, you can always copy and paste text into the notes section.)

8. If you have lots of time to while away, click on the popular section under the del.icio.us homepage. You'll be able to see the articles that people are saving, and what kind of tags they're using. It's a fascinating way to learn all kinds of random facts.
9. Now your email's verified, you're ready to start.
10. After finding an article that you want to bookmark, click the Tag button, and a new tab will appear.

11. The new tab will show the url (web address) of the article you've selected, the description (which is the title of the article), any notes that you want to add, and tags. Separate the tags by a space. The blue links at the bottom show tags created by other people that might be relevant. Click on one of these if you'd like to apply the tag to your tags.
Now, you've created your first del.icio.us bookmark. Click on the checkboard button (on your browser) to return to the homepage.

12. You'll see your homepage with your recently added article. You can edit or delete the article's information or bookmark by clicking on the edit/delete to the right of the article's title.
It's worth remembering that you might have your bookmarks neatly organized, but sometimes online content has a finite life online. Bookmarks do become obsolete, and if you positively cannot live without a piece of information, consider printing it out or copy/pasting the text (with proper references of course) into Word or other word processing program.

Sunday, October 15, 2006
Automated Content: RSS & Bloglines
Your blog's up and running well. You're using a template that interests you, your images are uploaded easily, and things are fantastic. Except....
What else is there to write about?
There are probably websites that you read regularly, to check for breaking news, and other interesting topics. It'd be nice if you could find a way to bring all of these disparate webpages together. It'd be even nicer if by bringing these things together, you could find more topics to write about.
An RSS feed combined with a feed reader can accomplish these wishes.
Every website contains content, which is why you'd visit. In order to see if the site contained new content, you'd have to type the address or click a bookmark. Even then, there's no guarantee that the site would have been updated in which case, it'd be a waste of time.
An RSS reader (like Bloglines) collects your favorite websites and displays their content on a single page, while notifying you when new articles are updated. An RSS feed is a website's announcement that new content has been posted. It's received by the RSS reader and from there you can read the new materials. This saves you the effort of regularly visiting your favorite blogs or sites. For breaking news, though, it's easier to go directly to the news source since feed readers are usually updated at intervals.
Bloglines is a web-based RSS reader that's easy to use and doesn't require a download. It can also be accessed from any computer.
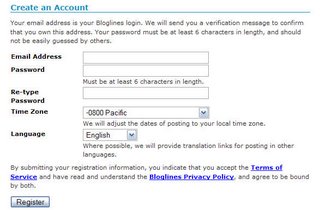
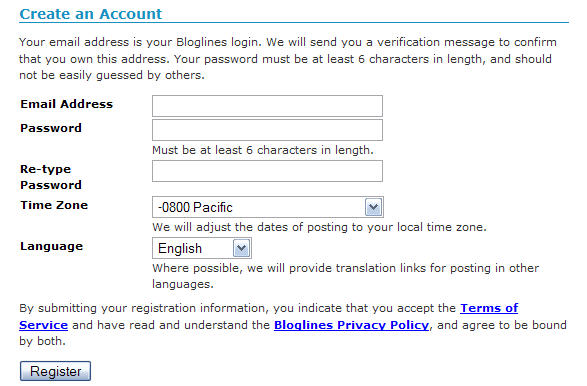
1. The sign-up process is fairly standard, and begins in the center of the Bloglines page.

2. After you you provide your email, and password, you'll be asked to confirm that your email address is yours and is valid. Wait for the Bloglines site to email you, click the link in the email they send, and then Bloglines knows that your email address is yours. (Sometimes, people will sign up for different free webservices using someone else's email address in hopes that that address will be spammed. This is a polite way around that practice.)
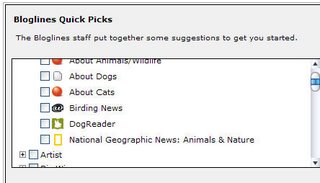
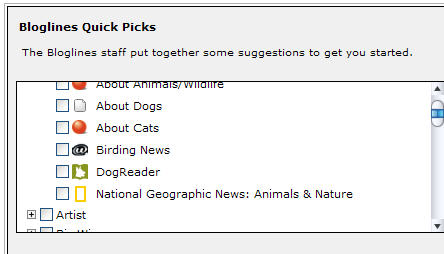
3. Under the welcome box after you confirm your registration, you'll see two boxes on the right hand side of the screen. Of the two boxes, the box on the left is where we'll start. This is the Quick Picks box, and Bloglines has sorted a few popular feeds into categories. Click on the Plus sign to expland the category, allowing you to see each blog within that category, or click on the check box to subscribe to every blog within that category.
Bloglines uses the subscribe/unsubscribe terminology for deciding that you want to be notified that a website's been updated.
Select as many of the interesting websites as you want, but know that each of these sites will likely update more than once a day with multiple articles. This can lead to a very large selection of things to read once you're using Bloglines fully! I'd advise to select no more than 10 feeds until you're more familiar with the way things work.
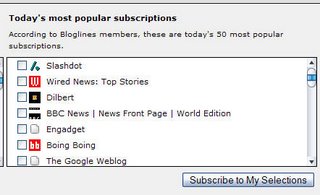
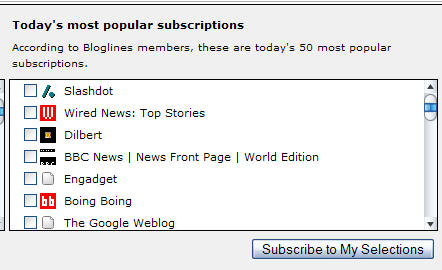
4. The selections you made from the left box will be selected in the right box, which is a collection of the most popular feeds from that day. Select the feeds you're most interested in, and then click Subscribe to My Selections.
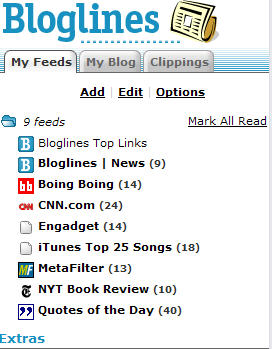
5. This is your feed list. The folder at the top tells you how many feeds you're subscribed to, and offers the handy Mark All Read option in case you get overwhelmed with unread articles.
Notice that all the links are in bold with a number behind them. The bold shows that the feed has been updated since the last time you checked. The number refers to how many articles exist in the feed. (At first, Bloglines will provide you with a great many articles from your selected feeds, because it assumes that you'll want to read past articles as well.)

6. Click on a link to see the articles display in the right hand pane of the screen. This is where your articles will be displayed, and you'll always have access to the Bloglines menus on the left pane.
Now you have a list of the articles available for you to read, distinguished by alternating grey and white shading. At the bottom of each article, the same information appears: the dates show when the article was posted, when Bloglines added the article (under updated), and provides you with options to email, clip, or blog the article. The Keep New check box allows the checked article to be displayed every time that you click on the feed name. (I've had problems with the items displaying reliably, so it's recommended that you email the articles that you're most interested in.)
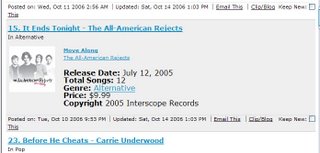
This article is about the top songs on iTunes, and shows a number of links within the article. Not every article will be displayed fully in Bloglines - some are designed to just show up incompletely on any feed reader, and you'll have to click on the article's title link to read the rest of the article on a separate page.
This article is complete, but if you want more information on the band displayed, you can click on any of the provided links to see a separate page.
In essence, Bloglines acts as a ringmaster for the great Internet circus. It's a way to organize and view the pages that you like best from the chaos.
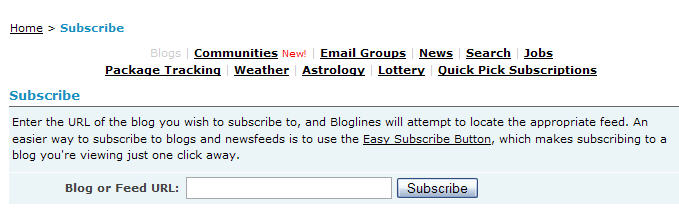
7. You can add more content by clicking the Add button from the top left pane of your feeds list. Once you're there, the right hand pane will show a number of options. Bloglines will try to find the feed for you if you're unable. A growing number of websites display some kind of badge showing that they're providing an RSS feed. Some even have a little button saying Bloglines, so you'd only have to find and click that link to add their website to your Bloglines feeds. Other sites provide a link showing where their feed's located. Enter this address into the Blog or Feed URL space.
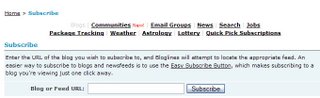
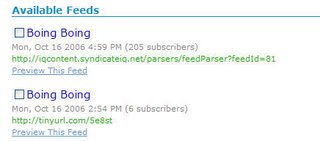
Once you've entered the address, Bloglines will (try to) find the feed for you. If it does, you'll be presented with this screen. Don't worry about what it means - just preview the feed with the link underneath, and if you like it, subscribe to that particular feed with the subscribe button on the bottom. If the feed has a lot of different variations, you may be scrolling for a minute.
The standard settings are: folder - toplevel, updated items - display as new, and display preferences - default. These are good to leave as they are.
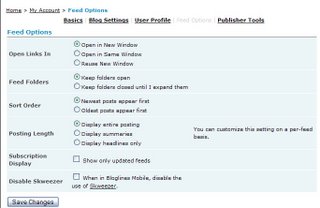
8. Now, go to the Options link in the top right of your screen. Here, you're able to change your account settings. In the basics tab, you can change your email address and password. The blog settings will allow you to set up a blog with your saved articles, but that's not as useful since you've already created a blog. The user profile link will allow you to fill in completely optional information about yourself. The feed options link is the one that you want to check. The settings should be defaulted to these, but feel free to experiment with these settings. I've found that these display articles in a pleasing and helpful way.
Get creative! (Just remember what settings you used so you can revert back to them, if necessary.) If you get overwhelmed with posts, you can always unsubscribe from the feed.
What else is there to write about?
There are probably websites that you read regularly, to check for breaking news, and other interesting topics. It'd be nice if you could find a way to bring all of these disparate webpages together. It'd be even nicer if by bringing these things together, you could find more topics to write about.
An RSS feed combined with a feed reader can accomplish these wishes.
Every website contains content, which is why you'd visit. In order to see if the site contained new content, you'd have to type the address or click a bookmark. Even then, there's no guarantee that the site would have been updated in which case, it'd be a waste of time.
An RSS reader (like Bloglines) collects your favorite websites and displays their content on a single page, while notifying you when new articles are updated. An RSS feed is a website's announcement that new content has been posted. It's received by the RSS reader and from there you can read the new materials. This saves you the effort of regularly visiting your favorite blogs or sites. For breaking news, though, it's easier to go directly to the news source since feed readers are usually updated at intervals.
Bloglines is a web-based RSS reader that's easy to use and doesn't require a download. It can also be accessed from any computer.
1. The sign-up process is fairly standard, and begins in the center of the Bloglines page.
2. After you you provide your email, and password, you'll be asked to confirm that your email address is yours and is valid. Wait for the Bloglines site to email you, click the link in the email they send, and then Bloglines knows that your email address is yours. (Sometimes, people will sign up for different free webservices using someone else's email address in hopes that that address will be spammed. This is a polite way around that practice.)
3. Under the welcome box after you confirm your registration, you'll see two boxes on the right hand side of the screen. Of the two boxes, the box on the left is where we'll start. This is the Quick Picks box, and Bloglines has sorted a few popular feeds into categories. Click on the Plus sign to expland the category, allowing you to see each blog within that category, or click on the check box to subscribe to every blog within that category.
Bloglines uses the subscribe/unsubscribe terminology for deciding that you want to be notified that a website's been updated.
Select as many of the interesting websites as you want, but know that each of these sites will likely update more than once a day with multiple articles. This can lead to a very large selection of things to read once you're using Bloglines fully! I'd advise to select no more than 10 feeds until you're more familiar with the way things work.
4. The selections you made from the left box will be selected in the right box, which is a collection of the most popular feeds from that day. Select the feeds you're most interested in, and then click Subscribe to My Selections.
5. This is your feed list. The folder at the top tells you how many feeds you're subscribed to, and offers the handy Mark All Read option in case you get overwhelmed with unread articles.
Notice that all the links are in bold with a number behind them. The bold shows that the feed has been updated since the last time you checked. The number refers to how many articles exist in the feed. (At first, Bloglines will provide you with a great many articles from your selected feeds, because it assumes that you'll want to read past articles as well.)
6. Click on a link to see the articles display in the right hand pane of the screen. This is where your articles will be displayed, and you'll always have access to the Bloglines menus on the left pane.
Now you have a list of the articles available for you to read, distinguished by alternating grey and white shading. At the bottom of each article, the same information appears: the dates show when the article was posted, when Bloglines added the article (under updated), and provides you with options to email, clip, or blog the article. The Keep New check box allows the checked article to be displayed every time that you click on the feed name. (I've had problems with the items displaying reliably, so it's recommended that you email the articles that you're most interested in.)
This article is about the top songs on iTunes, and shows a number of links within the article. Not every article will be displayed fully in Bloglines - some are designed to just show up incompletely on any feed reader, and you'll have to click on the article's title link to read the rest of the article on a separate page.
This article is complete, but if you want more information on the band displayed, you can click on any of the provided links to see a separate page.
In essence, Bloglines acts as a ringmaster for the great Internet circus. It's a way to organize and view the pages that you like best from the chaos.

7. You can add more content by clicking the Add button from the top left pane of your feeds list. Once you're there, the right hand pane will show a number of options. Bloglines will try to find the feed for you if you're unable. A growing number of websites display some kind of badge showing that they're providing an RSS feed. Some even have a little button saying Bloglines, so you'd only have to find and click that link to add their website to your Bloglines feeds. Other sites provide a link showing where their feed's located. Enter this address into the Blog or Feed URL space.
Once you've entered the address, Bloglines will (try to) find the feed for you. If it does, you'll be presented with this screen. Don't worry about what it means - just preview the feed with the link underneath, and if you like it, subscribe to that particular feed with the subscribe button on the bottom. If the feed has a lot of different variations, you may be scrolling for a minute.
The standard settings are: folder - toplevel, updated items - display as new, and display preferences - default. These are good to leave as they are.

8. Now, go to the Options link in the top right of your screen. Here, you're able to change your account settings. In the basics tab, you can change your email address and password. The blog settings will allow you to set up a blog with your saved articles, but that's not as useful since you've already created a blog. The user profile link will allow you to fill in completely optional information about yourself. The feed options link is the one that you want to check. The settings should be defaulted to these, but feel free to experiment with these settings. I've found that these display articles in a pleasing and helpful way.

Get creative! (Just remember what settings you used so you can revert back to them, if necessary.) If you get overwhelmed with posts, you can always unsubscribe from the feed.
Sunday, October 08, 2006
Image Manipulation with PXN8.com
Picasa isn't the only program to offer helpful and free photo editing. A Google search will reveal many programs with varying abilities and features. Lifehacker recommends PXN8, which in addition to having an amusing name, has a variety of interesting tools and effects. Also, this site requires no software to be downloaded, and is completely free (although ads are prominently placed.) One fantastic feature of this site is the integration with Flickr.
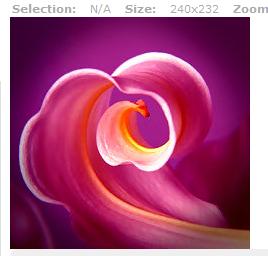
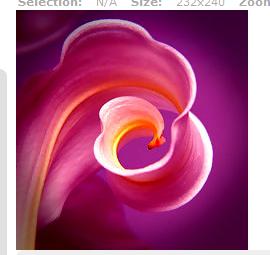
9. Clicking on the Choose your image link will bring up the standard browse and select window. Find and upload your image. I'll be using the same flower from Zuleyha which is available for derivative works by the Creative Commons license.
There are different options available on this menu. Feel free to experiment, and make sure that you've saved the original of your image to Gmail.
Mousing over the buttons will show what each option does. Notice the prominent Undo option.
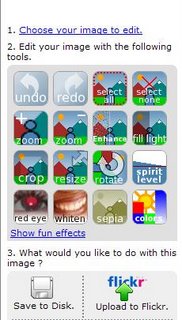
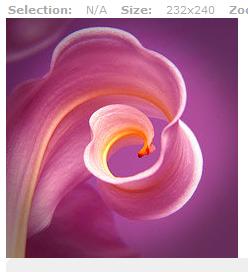
10. Click on the Fun Effects link, and then click on the Lomo option which darkens the corners and brightens the center of the picture, focusing attention on the middle of the image. I used 60% opacity with this result. I like the way the circular shape of the colors highlights the already winding pieces of the petal.
On top of the photo, the size of the photo is displayed in pixels.
11. If you press Undo, a small text line will appear at the top telling you what changes are being undone. If you decide that you'd like to keep the changes, there's always Redo.
I've now decided that the intensity of the colors isn't dramatic enough, so I'm going to select Enhance from the top menu.

12. Because I'm experimenting with this image, and want to make it look not only dissimilar to the original image but also the Picasa-edited image, I'm going to rotate this version. Once.

13. Twice.
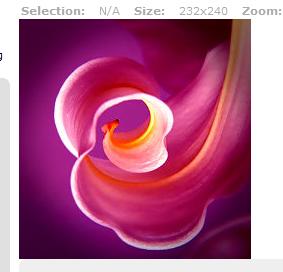
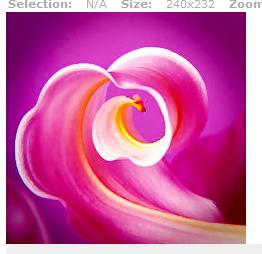
14. Three times. The size has now changed from 232X240 to 240X232. This picture has now been fairly well edited, and I'm satisfied with the results. Except, it seems a little dark....
15. After using the Fill Light option twice.
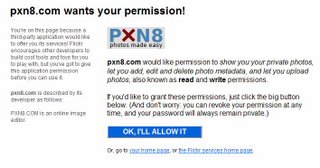
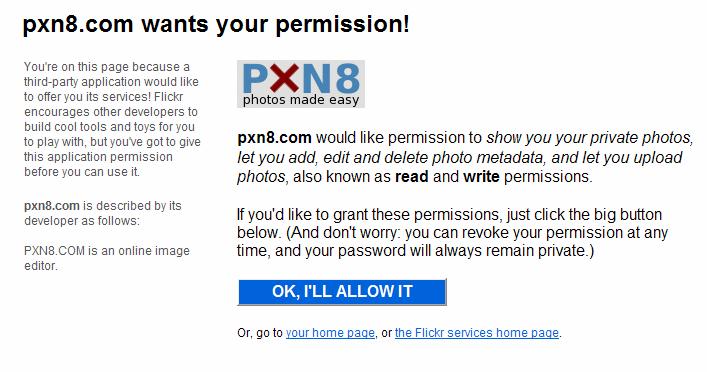
Now that I'm done with this particular variation of the image, I can either save the file to my computer or upload it to Flickr, which is what we'll do. Click on the Upload to Flickr option, and log into Flickr with your account information.
16. After you've signed in, you'll be asked to verify that PXN8 is allowed permission to upload your photos to your Flickr account.
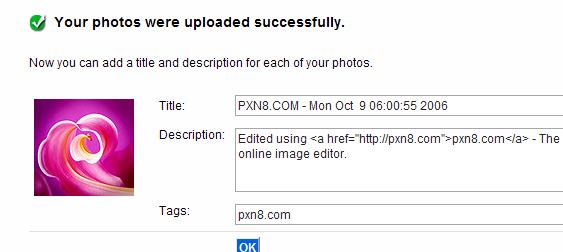
17. After you've accepted, you'll see this screen with confirmation that your photos were uploaded. PXN8 automatically uploads and autofills the photo title, description, and tags, all of which can be deleted if you'd rather not provide that site with free advertising. You can now use Flickr to upload to your blog, or just organize your collection.

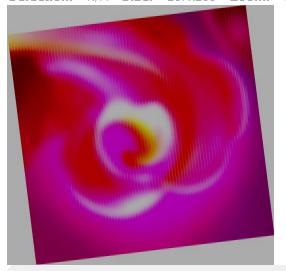
18. This shows a few more fun options from PXN8. This is the culmination of the:
-saturate
-spirit horizon
-rotate
-enhance
-interlace (with white) options.
19. To make this collage, I used Picasa's collage feature and added several of the edited photos to the photo tray. Voila!

9. Clicking on the Choose your image link will bring up the standard browse and select window. Find and upload your image. I'll be using the same flower from Zuleyha which is available for derivative works by the Creative Commons license.
There are different options available on this menu. Feel free to experiment, and make sure that you've saved the original of your image to Gmail.
Mousing over the buttons will show what each option does. Notice the prominent Undo option.

10. Click on the Fun Effects link, and then click on the Lomo option which darkens the corners and brightens the center of the picture, focusing attention on the middle of the image. I used 60% opacity with this result. I like the way the circular shape of the colors highlights the already winding pieces of the petal.
On top of the photo, the size of the photo is displayed in pixels.

11. If you press Undo, a small text line will appear at the top telling you what changes are being undone. If you decide that you'd like to keep the changes, there's always Redo.
I've now decided that the intensity of the colors isn't dramatic enough, so I'm going to select Enhance from the top menu.
12. Because I'm experimenting with this image, and want to make it look not only dissimilar to the original image but also the Picasa-edited image, I'm going to rotate this version. Once.

13. Twice.

14. Three times. The size has now changed from 232X240 to 240X232. This picture has now been fairly well edited, and I'm satisfied with the results. Except, it seems a little dark....

15. After using the Fill Light option twice.
Now that I'm done with this particular variation of the image, I can either save the file to my computer or upload it to Flickr, which is what we'll do. Click on the Upload to Flickr option, and log into Flickr with your account information.

16. After you've signed in, you'll be asked to verify that PXN8 is allowed permission to upload your photos to your Flickr account.
17. After you've accepted, you'll see this screen with confirmation that your photos were uploaded. PXN8 automatically uploads and autofills the photo title, description, and tags, all of which can be deleted if you'd rather not provide that site with free advertising. You can now use Flickr to upload to your blog, or just organize your collection.
18. This shows a few more fun options from PXN8. This is the culmination of the:
-saturate
-spirit horizon
-rotate
-enhance
-interlace (with white) options.

19. To make this collage, I used Picasa's collage feature and added several of the edited photos to the photo tray. Voila!
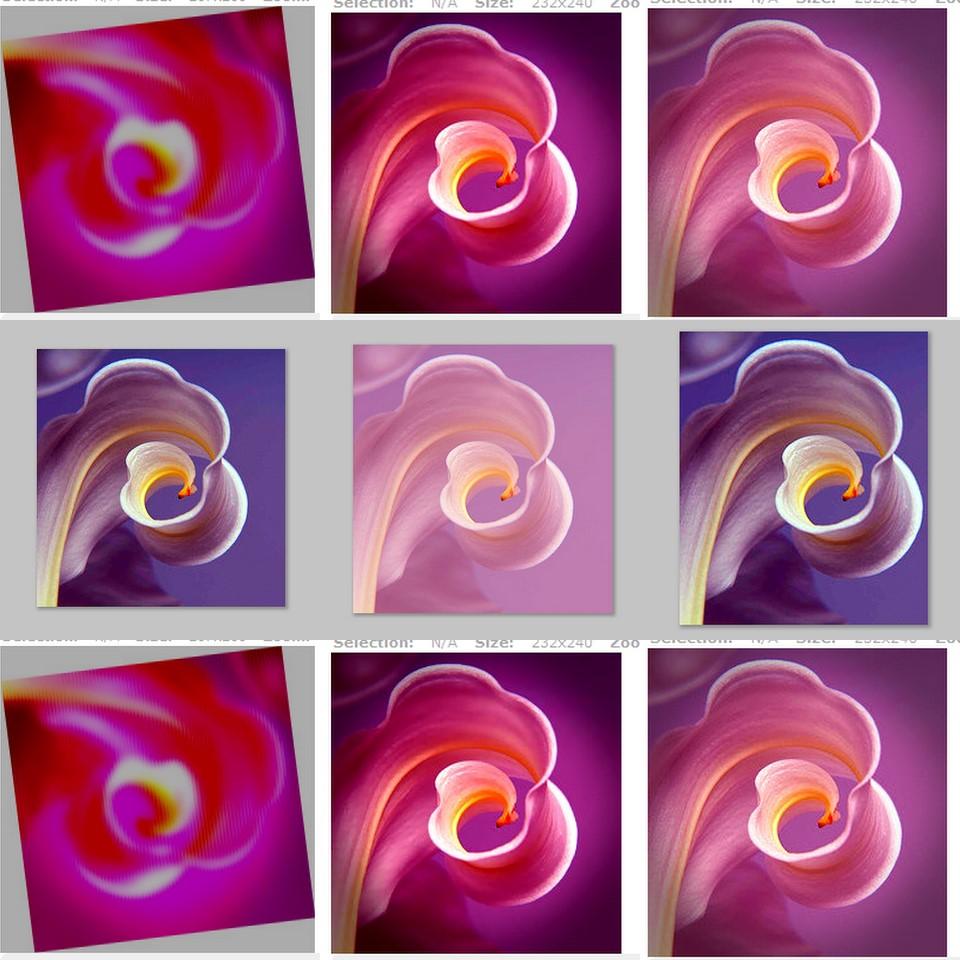
Image Manipulation with Picasa
The sky's the limit for the number and kind of changes that can be made to an image, known as photo manipulation. Photo manipulation can refer to anything from changing the size of an image, brightening colors in a picture, cropping unwanted elements from a picture, to replacing one person's head with another. Adobe Photoshop is a program which can make all of these changes, but it's incredibly complex. We'll use the image editing abilities of Picasa and another online editor, which have the advantages of being very user-friendly, free, and easy to use.
It's easier to see effects than to explain them, and the purpose of this blog is more to show you possibilities than to educate about every tangential subject presented. We'll just skim through some of the things that can be easily done with editing software and websites.
To start, find an image from your Picasa library that you want to change. Perhaps the color of a recent photo isn't as bright and vivid as you'd hoped. Open the photo, and email the original image to your Gmail account. This will help you avoid Picasa being overly "helpful" and saving the changes to your original. If you decide, after experimenting, that the original is better, you can easily download the picture from your Gmail account.
I'm going to be using a Creative Commons licensed photo from the Flickr Color Selectr taken by Zuleyha.

Once you have Picasa's library open, you'll see the Tools menu, which should be somewhat familiar. Perhaps, you've used different settings and effects already.
1.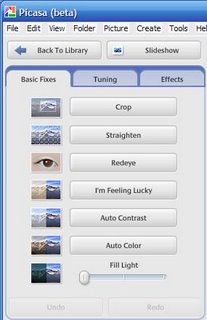
I'll try to skim some of the more interesting and common features. Perhaps you want to lighten your photo. Move the Fill Light slider and watch your image become lighter as the image below illustrates. The Fill Light slider is in the middle, which means that the flower is 50% lighter than before.
2.
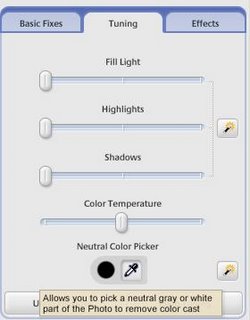
3. The Tuning tab also has a Fill Light slider. The nice thing about Picasa (and most other photo editing programs) is that every action can be undone. All of the effects on the Tuning tab will register as one change. If you click the Undo button, while on this tab, each and every change you've made while here, will be undone.
I decided that the picture is too pink so I clicked on the Neutral Color Picker. Once the eyedropper tool appeared, I clicked on part of the photo, which changed the entire picture. The end results depend where you click.
If you're not adventurous with this step, click on the Magic Wand icons to have adjustments made automatically.
4. Here's the results of the automatic changes.The result is much darker and crisp looking than the original photo which had a lovely, blurry ambience about it.

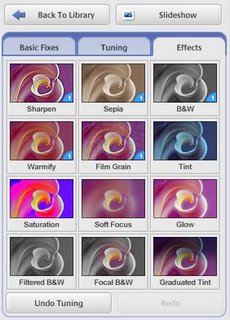
5. The Picasa Effects tab provides you with thumbnail previews of effects applied to you image. As always, you can undo these changes once you've selected them, along with previous changes.
6. Now, I've moved back to the Basic Fixes tab. I've chosen the "I'm Feeling Lucky" option which automatically fixes lighting and color.
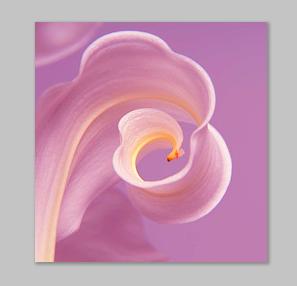
This makes the background much more of a rich purple and contrasts nicely with the delicate yellow in the flower. With all of these adjustments, I find myself happy with the way the flower looks. But...that wide open expanse of purple on the right side isn't something that I want to keep.

7. The crop tool is the right tool for this task. Once you have the option, choose manual. You can also use this to resize your photos. Resize is primarily useful to reduce a very large image down to a workable size. You've probably seen photos so large that they fill the browser window - and then some - requiring you to scroll over to see the rest of the image. Resize lets you compress the image.
You will want to select, with the mouse, the parts of the image that you want to keep.
I started at the top left, and clicked and dragged the crop box across the picture. The image will be bright where the box is dragged, and dull where it will be cut out. Preview, as always, is a useful feature. The dull purple on the right side is what I decided to eliminate from the picture, or crop, along with slivers from the top and bottom. It's almost impossible to include every pixel of a picture, so these imperceptible slivers will be omitted as well as the other parts you crop.
You can reset the settings if you're not happy, and accept will save your changes.

8. Here's the version of the flower with all of the settings adjusted to my liking.

It's easier to see effects than to explain them, and the purpose of this blog is more to show you possibilities than to educate about every tangential subject presented. We'll just skim through some of the things that can be easily done with editing software and websites.
To start, find an image from your Picasa library that you want to change. Perhaps the color of a recent photo isn't as bright and vivid as you'd hoped. Open the photo, and email the original image to your Gmail account. This will help you avoid Picasa being overly "helpful" and saving the changes to your original. If you decide, after experimenting, that the original is better, you can easily download the picture from your Gmail account.
I'm going to be using a Creative Commons licensed photo from the Flickr Color Selectr taken by Zuleyha.

Once you have Picasa's library open, you'll see the Tools menu, which should be somewhat familiar. Perhaps, you've used different settings and effects already.
1.

I'll try to skim some of the more interesting and common features. Perhaps you want to lighten your photo. Move the Fill Light slider and watch your image become lighter as the image below illustrates. The Fill Light slider is in the middle, which means that the flower is 50% lighter than before.
2.

3. The Tuning tab also has a Fill Light slider. The nice thing about Picasa (and most other photo editing programs) is that every action can be undone. All of the effects on the Tuning tab will register as one change. If you click the Undo button, while on this tab, each and every change you've made while here, will be undone.
I decided that the picture is too pink so I clicked on the Neutral Color Picker. Once the eyedropper tool appeared, I clicked on part of the photo, which changed the entire picture. The end results depend where you click.
If you're not adventurous with this step, click on the Magic Wand icons to have adjustments made automatically.

4. Here's the results of the automatic changes.The result is much darker and crisp looking than the original photo which had a lovely, blurry ambience about it.

5. The Picasa Effects tab provides you with thumbnail previews of effects applied to you image. As always, you can undo these changes once you've selected them, along with previous changes.

6. Now, I've moved back to the Basic Fixes tab. I've chosen the "I'm Feeling Lucky" option which automatically fixes lighting and color.
This makes the background much more of a rich purple and contrasts nicely with the delicate yellow in the flower. With all of these adjustments, I find myself happy with the way the flower looks. But...that wide open expanse of purple on the right side isn't something that I want to keep.

7. The crop tool is the right tool for this task. Once you have the option, choose manual. You can also use this to resize your photos. Resize is primarily useful to reduce a very large image down to a workable size. You've probably seen photos so large that they fill the browser window - and then some - requiring you to scroll over to see the rest of the image. Resize lets you compress the image.
You will want to select, with the mouse, the parts of the image that you want to keep.
I started at the top left, and clicked and dragged the crop box across the picture. The image will be bright where the box is dragged, and dull where it will be cut out. Preview, as always, is a useful feature. The dull purple on the right side is what I decided to eliminate from the picture, or crop, along with slivers from the top and bottom. It's almost impossible to include every pixel of a picture, so these imperceptible slivers will be omitted as well as the other parts you crop.
You can reset the settings if you're not happy, and accept will save your changes.

8. Here's the version of the flower with all of the settings adjusted to my liking.

Monday, October 02, 2006
Yours, Mine, Ours: Copyright Issues
With the internet affording opportunities to create and to be exposed to other people's creations, it's no surprise that copyright issues have become important.
Copyrights are issued for an original creation, the minute it's created. You hold all the rights to your creation - assuming that you're not infringing upon someone else's copyrights with that creation.
Say, for example, you write an original story and post it on the web. That's your intellectual property, which is protected under a copyright. Intellectual property is further divided into two parts: Industrial Property and Copyright.
Industrial Property is defined as "trademarks...commercial names and designations" where "Copyright relates to artistic creations, such as books, music, paintings and sculptures, films and technology-based works such as computer programs and electronic databases." A very informative guide to these terms is continued in "Understanding Copyright and Related Rights" viewable as a PDF.
If, however, you've chosen to write an alternate ending to a copyrighted movie, your work is not considered an original creation - but rather a derivative of someone else's work. Your creation, however unique, is not protected by copyright laws because it's not wholly your creation.
If you then attempt to take your derivative story and sell it to a publisher, it's a
violation that's likely to bring the movie's lawyers down upon you, brandishing all kinds of cease and desist notices and notices of copyright infringements and violations.
There's a tradition of copyright holders ignoring minor infringements such as the example of derivative stories created for fun, but when these works start becoming for-profit or used commercially, the copyright holder might start serious infringement proceedings.
Suppose that you have created something original and you want a way to share it with the world. Perhaps on your last vacation, you snapped a stunning picture of the Golden Gate Bridge at sunset. You hold the copyright to that image, but you'd like to allow others to use it - but not commercially.
The law, according to Creative Commons is a bit fuzzy and lacks the ability to specify how and who can use a copyrighted work with the conditions placed upon it.
That's where the Creative Commons licenses come in: they've drawn up legally binding copyright licenses allowing you to exactly specify how your picture is used. These different types are explained here.
There's even a helpful guide which asks you a few questions how you want your work to be used. Once you answer the questions, it will tell you which license is appropriate and will provide you with HTML codes (a logo) so you can display them on your website. This will inform anyone how you have copyrighted your image.
Wikipedia has a good explanation of the Creative Commons idea. This is slightly more understandable than the Creative Commons FAQ
A good example of a site that makes use of Creative Commons licensed images is the Flickr color site from last week's posting.
Further reading:
10 Big Myths about Copyright Explained
These last two articles are perhaps the most clearly written and offer the most useful guidelines for blogging and websites.
When Copying Is Okay: The "Fair Use" Rule
Getting Permission to Publish: Ten Tips for Webmasters
Subscribe to:
Posts (Atom)