Monday, August 28, 2006
Part 6: Introduction
Each section is numbered in the title and then numbered with each main idea.
Part 1: Creating and Naming Your Blog
Part 2: Dashboard and Adjusting Settings
Part 3: Settings Continued
Part 4: Editing Your Profile
Part 5: Creating Posts with Compose
Part 6: Introduction
Once you locate the first section, it will behave exactly as any other screen online - with the content scrolling downward.
If you're having difficulty locating the posts, ctrl+f to bring up the Find dialog box, enter the term "Part 1" without the quotes, and it should take you to the section you're looking for.
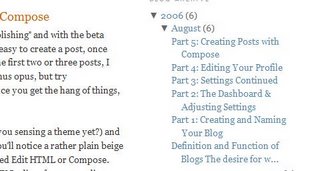
Alternately, you can look at the very right hand side of the blog where the individual post titles will be found, as in the following example. You can click on the title of any of those to be brought to the appropriate section.
Finally, if you have any questions, comments, or things that I should expound upon further, please comment. I'll try to make everything as clear as I can.
Good luck, and have fun creating your blog and then composing entries!
Part 5: Creating Posts with Compose
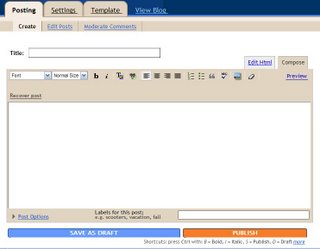
21. Go back to the Dashboard (are you sensing a theme yet?) and click on the Posting | Create tab. You'll notice a rather plain beige window with two smaller tabs labeled Edit HTML or Compose. (The Compose option is the WYSIWYG editor from an earlier section.) Start out in the Compose tab by clicking that link. You'll notice the color of the tab change (and be careful because the dark tan is the focus window which is the opposite of your Posting, Settings, and Template tabs above.)
Along the top of the Compose window are a row of different icons. If you hover the mouse above each one, it will provide an explanation of what each feature does. These are standard icons from programs such as MS Word or the Gmail compose window.
From here you can: bold your text
italicize it
change the color
include a link
(You can do this by typing a phrase, highlighting it with your mouse, and then clicking on the link button. A dialog box will appear and ask you for the link. Type in the address, hit ok, and voila! An instant link.)
Other options are to change the way your text appears on your blog, add bulleted or numbered lists, add quotes, spellcheck your entry, and add a picture. (We'll discuss uploading images and pictures in another posting.) The eraser also lets you erase any formatting which you might have added. Standard text manipulations are also possible here: like ctrl+a to select all of your text, and then delete to start again with a blank window.
Preview is the link to click to see how your post will appear (similar to what you've typed because of the WYSIWYG editor). Ctrl+click this link to show your preview in another window or tab.
While you're writing, if you inadvertantly are on the wrong tab, it's not a problem. You can flip between the two modes without any loss of your posting. Notice the font changes with each tab. Don't worry, your blog will have one look and one font (unless you change the font with a dropdown option on the Compose tab) to it no matter which tab you use to write. If you move away from this page, though, you'll receive a dialog box telling you that you will lose unsaved data and offer you the opportunity to cancel and remain on the page. Before you navigate away from this page, either Save As Draft or Publish.
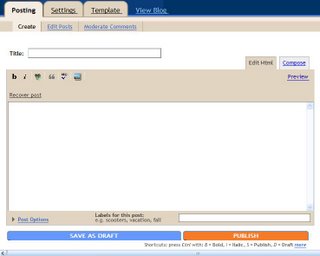
22. This is a preview of the Edit HTML tab which will be discussed in a later section. Use the Compose tab in the interim, and don't be afraid to post and delete until you feel comfortable making "a real post."
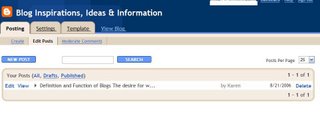
23. Now that you've experimented a bit, Save As Draft. This will bring you to the post management screen. If you've not entered a title, Blogger will nominate the first few words of your entry as the title. You can choose to view all of the posts that you've created, just the drafts, or just the published posts. When this screen was captured, I had only one post finished. Clicking on Edit will bring you right back to the Compose or Edit HTML tabs where you can finish writing.
Clicking Publish will tell you if your post has published successfully, and will offer you the choices to view your blog or to view your blog in a new window. Take a moment and enjoy what you've created! Or click on the Edit button and then delete your post and rewrite it. Both the Edit and Create buttons will take you back to the now familiar Posting tab. Remember, if you don't like what you've posted, there are many ways to delete it.
Sunday, August 27, 2006
Part 4: Editing Your Profile
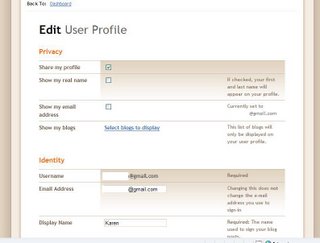
17. The first four options relate to privacy, and you can decide how much information you want revealed to passersby. You've already created your profile, now it's your chance to share it or not.
My full name isn't displayed on the blog, but I've also not entered it - just my first name and my last initial.
Showing your email address is an excellent way to receive lots of spam. It's also a great chance to connect with someone that may have lost contact with you. If you do have your email address displayed, use an email address specifically set up for this purpose - one that you won't mind being public. With the multitudes of free email accounts on the web, choose a Yahoo or Gmail account. (Please note that this email address is just an email address, and not necessarily the same as your Google Account used to log into Blogger.)
Since multiple blogs aren't an issue, skip over this last option in the privacy section.
In the identity section, your username is fixed. You can change your email address (as discussed above) if you'd like to publicize it without having your main email address public.
The display name is the name used to sign your posts, and can be anything that you want it to be.
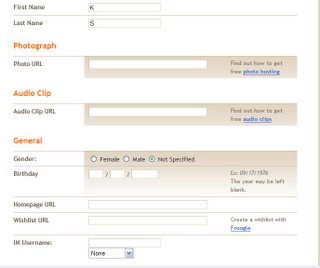
18. Filling in your full name in this section is a personal decision and goes along with the option of displaying your name from the paragraphs above.
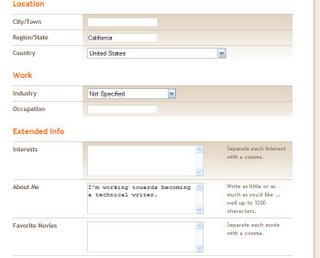
The next parts of the screen captures show some of the options available in this section. Fill in the parts that you're interested in sharing, and don't forget to save your changes.
Part 3: Settings Continued
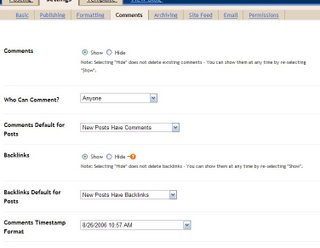
Backlinks refer to other sources that link back to your blog. If someone admires something you've written, and includes a link back to your blog from theirs, that's called a backlink. There are other names for it, but this is the name that Blogger uses.
Anyone can comment on this blog, but you can restrict the ability to friends or registered Blogger users.
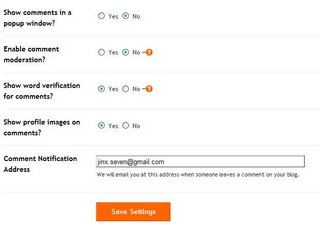
12. The second part of the Comments section follows. Explanations can be found in the orange question dots. I've chosen word verification because there are a number of people who comment on blogs solely for the point of spamming. If someone has a profile photo, it will display next to their comment. Save your settings, and continue to the next section.
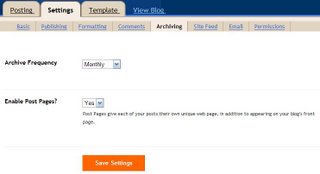
13. Settings | Archiving is a very short section. The posts on this blog will be grouped monthly, and able to be viewed that way from the archive. A month is the standard time for archives. I've chosen to give each posting its own web page for ease of future reference. Save settings, and we're off to the next section.
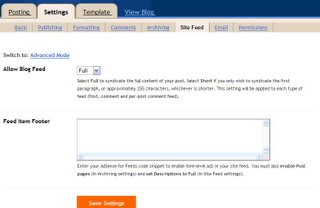
14. The Settings | Site Feed tab deals with advanced issues, which we won't address until a future post. Until then, save settings, and onto the next section.
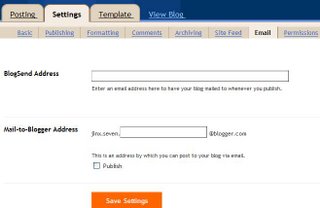
15. This tab also contains advanced features, but it will allow you to post by email or email your blog when you update it.
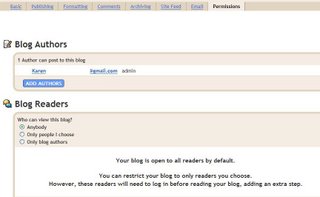
16. The Settings | Permissions tab is the final Settings tab. I'm the only person who can post to this blog, but you can allow other authors to yours should you choose.
This blog allows anyone who stumbles across it to read, but you can restrict it to specific Blogger users (who must have a Blogger account) or anyone that you've designated as an Author on your blog. That's all of the settings!
Part 2: The Dashboard & Adjusting Settings
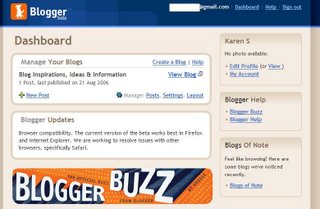
Starting from the top, let's go over the components of the Dashboard. At the very top is your Google Account information, which won't be displayed when someone else is viewing your blog.
The first tan box on the top right is where the profile can be edited and account information can be viewed. We'll edit the profile in a future post.
The white box in the middle of the screen entitled "Manage Your Blogs" is where you will return, again and again. This blog is titled "Blog Inspirations, Ideas & Information" and the last post's publish date is given. The "Create a Blog" link is to create additional blogs within your blog, should you choose to do so, and is beyond the scope of this project. The "Help" link is invaluable. If you ctrl+click that link, it will bring up the help menu in either a new tab or a new window (depending on your browser.) From there, you can find the way to resolve an issue or read more about a new idea and still be able to access your blog. The green plus sign will let you create a new post, but have patience! We'll create a new post after all of the settings are adjusted.
The next tan panel down is the third place to find the help menus, and Blogger Buzz is also found beneath the second white panel. This is the Blogger blog which announces changes, issues, and updates. The second white panel also provides information on recent changes.
The third tan panel is one of many blogs that Blogger staff find interesting.
In the first white panel, click the "Settings" link.
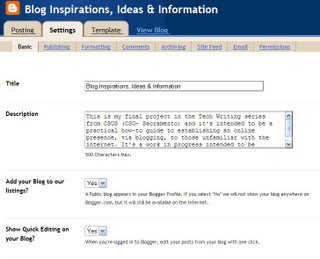
6. This brings you to a new screen. The blog's title is on the top, and instead of panels, there are tabs. The controls are divided up into three sections, neatly defined by tabs: posting, settings, and template. We'll cover the first two, and save the template options for another post. The settings tab is something that can be used once, and then left alone once you're content with the way that things are. The posting tab is something that will be used each and every time you create a post.
Note that the current, active tab is lighter than the other inactive tabs. This indicates that we are on the Settings tab under the Basic functions. Sometimes you'll see this in helpfiles as Settings | Basic.
Devise a title and description of your blog here.
I've chosen to make this blog public on Blogger, as well as on the internet. Enabling Quick Editing allows faster adjustments to posts - quite a helpful feature.
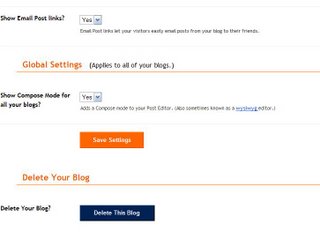
7. Say that your blog becomes popular or you want to share a page, enabling the Email Post link will allow your page to be emailed.
Global settings aren't really a concern, since we'll be staying with one blog, but you do want a Compose Mode. This allows you to use a wysiwyg editor (which the link explains is a "what you see is what you get" way to edit your posts. There won't be any changes from the way that you see the page with this editor to the way that your visitors see the page you've created. This simplifies page composition and eliminates a lot of frustration.)
The giant orange Save Settings button is found all over the site. Save your settings now, and we'll go onto the next Settings option.
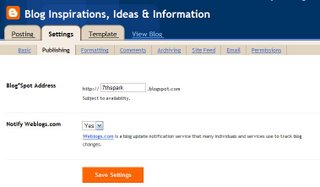
8. This is the Settings | Publishing tab and will let you change the address of your blog (should you wish) and allow frequent viewers of your blog know when you've updated. Save Settings here.
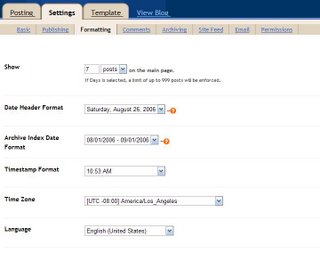
9. Now we're on the Settings | Formatting tab and all of these affect how your blog's dates will be displayed. I've chosen the settings that I think will work best for this blog. The orange question marks next to a feature will provide more information. A ctrl+click is recommended so you don't move away from your blog.
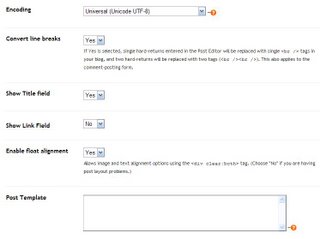
10. The second part of the Settings | Formatting tab is continued below with some of the more advanced options. It might be a good idea to leave the default settings until you've had a chance to understand more of how things work. As always, when you see the orange Save Settings button, save!
Part 1: Creating and Naming Your Blog
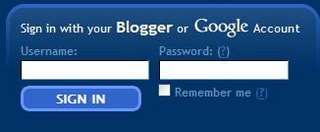
1. You're going to begin with the Blogger site. At the top right of the screen there is a log in screen where you can enter your Google Account name (your Gmail login name and password.) Enter that information, and you will be brought to the next screen.
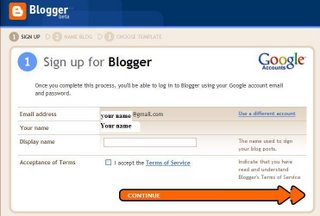
2. This is the sign up screen, where your Google Account information will be filled in, and there will be a blank space for your Display Name. (Note, this is the name that will be shown as the author of blog postings. You can change this name later through the Dashboard under the Edit User Profile.) This is not your blog's name. This is the name used to sign the blog postings.
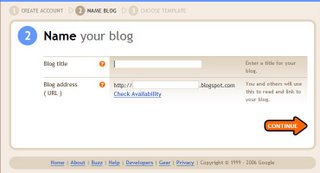
3. This next screen brings you to the blog naming process. Be prepared to take time here. The Check Availability link will provide suggestions for names that are similar to the one that you entered. Consider the strategic placement of a hyphen. Perhaps SaraSmith.blogspot.com is taken but Sara-Smith is available.
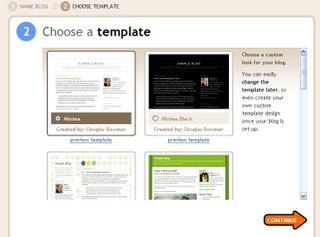
4. The next choice is to decide upon a template. This is the preset layout for your blog. It's easiest at this stage of blogging to choose one of these preset templates, and remember that you can change almost everything later as you become more proficient. The previews are helpful, and the color variations are grouped together, which is a new feature of the beta Blogger. Choose one that appeals to you, and save the customizations for another time.
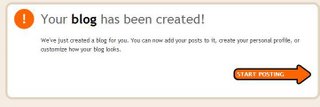
5. Once you've created a name for your blog, and Blogger's accepted it, congratulations, you have a blog!
Monday, August 21, 2006
Definition and Function of Blogs
The desire for written communication has been a constant in many lives and throughout the ages. What the internet's provided is the way to connect many people, but that's not a new concept to people who've used email to send photos and letters or who've browsed many websites. Perhaps what is new are blogs, which is short for "weblogs."
Letter writing has been a favorite hobby and has been modernized with the ability to send email. A diary provides a very specific view into someone's life. One day's entry, ripped from the diary, can provide the day-to-day details of an individual. Both of these hobbies are very localized with a specific and narrow focus of and on the world.
The difference is that blogging can be a fusion of:
letter writing
a scrapbook
a photo album
essay writing and opinion pieces
diary or journal keeping
Or, to be specific, it can do any one, or all of those activities very easily with only the limits of one's imagination and basic HTML knowledge. In addition, a blog is easier to maintain and change around than almost any of these other ideas. Eventually, anyway. At first, blog creation can be challenging, but the basic steps of blogging are limited. The more posts that are created, the easier it will become.
The advantage that a blog offers over a traditional website is the ability to easily update the site's content. The entries are usually viewed with the newest posts on the top, with an archive of past entries sorted by month.
You can share the details of your life:
instantly
inexpensively
with very little effort
There are many places to create your blog as any search engine will reveal. For our purposes here, we'll confine the blog to one hosted service (Blogger) which has recently launched their beta service. Since the builder hasn't been officially launched, there may be glitches, bugs, and other unexpected "features." There is also the opportunity to create a blog that's easier to create and maintain with these new blog tools. Perhaps the knowledge that the reader is not alone in struggling with something new will be of help later on.
History of the Blog
The relatively new form of communication known as blogging, has rapidly evolved since its first estimated appearance in 1997 . There's been a meteoric progression in the scope and function of blogging since then.
The first blogs were more or less online journals, limited in scope to the day to day activities and thoughts of individuals. It was difficult to include pictures, and the blogging process required a working knowledge of HTML and site design, along with ways to upload files to the website itself. The process was complex, and these websites were limited to those people with advanced computer and coding skills.
Commercial sites like Angelfire or Geocities simplified the process with site builders, which provided forms that the blogger could fill out - an early set of templates. Wikipedia estimates that blogging begain in 1994, with the term "blog" being introduced in 1997. Since then, the level of HTML necessary has been reduced to make a very user-friendly experience.
Now, the spectrum of topics ranges from:
personal blogs
political commentary
corporate sites
professional
television shows
and everything else that you could possibly imagine
Blogger recently launched its beta builder, and offers easy, one click customization to your blog. Google owns this service and now a Google account (Gmail email account) can be used to log into Blogger.
Clarification:Blogger is the blog builder and blogspot.com is where the blogs are hosted. They're part of the same service, but not interchangeable.
Related Reading
Wikipedia's thorough look at blogging history
basics of the internet
comparison of different bloghosting services
giant list of often tongue-in-cheek blogging definitions
news article speaking about impact of blogs
Concerns about Blogging
It's become increasingly common to hear reports of online identity thefts, stalking, or other problems related to the internet. It's advisable to take proactive steps to protect your privacy and safety while using the internet.
Blogging can be done with a relatively low level of risk since you, the writer, can decide upon the details included in your posts and information provided.
Anyone can stumble upon your blog, and if you use details of your personal life in your blog, you might have an audience that you weren't intending. It might be helpful to view your blog as a television show on a tv with millions of channels - there's no guarantee that anyone will stop on your particular channel, but consider what they'll see if they do.
If you live and work in a small town, it might not be the most sensible idea to post pictures of your family along with their names. Likewise, if you mention a specific location ("my favorite Starbucks on 33rd is where we always spend our Saturday mornings"), you could be providing details that someone could use in a negative way.
Limit the specific details of where you are, what you do, and how you live unless you can filter and control who reads your blog. Several blog sites provide this setting, which can range from only allowing registered users to view your blog, to only allowing those users that you've designated and approved to read your blog.
Consider creating an email address specifically for your blog, or not allowing your email address to be shown on your blog.
Work-Related Concerns
Writing about employers and place of employment can be detrimental to careers as a few highly-publicized bloggers have learned. Heather Armstrong, who writes dooce.com, has this to say about writing about work:
"I started this website in February 2001. A year later I was fired from my job for this website because I had written stories that included people in my workplace. My advice to you is BE YE NOT SO STUPID. Never write about work on the internet unless your boss knows and sanctions the fact that YOU ARE WRITING ABOUT WORK ON THE INTERNET."
When her story circulated around the internet, a word describing being fired for blogging about work was created - dooced.
Now, many companies have a specific policy dealing with blogs and the professional conduct required of its employees - even outside of the office.
The Electronic Frontier Foundation is an Internet privacy advocate which suggests blogging anonymously and offers its anonymous blogging guide as a way to protect your identity.
Related Reading
picking a domain name for a small business
cyberstalking overview
the ultimate resource for crime and the internet
a few featured interesting blog names
random blog name generator
frequently used words in blog titles
Naming Your Blog
Picking a name for your blog can be challenging - especially using an established service like Blogger. Many, many blog names have been claimed, and creativity is required to find a name that isn't taken. Things to derive a blog name from might include:
a personal hobby
a literary allusion
a pet's name
a favorite sports team
inside jokes
personal interests
subject reflective words
your name (assuming that privacy isn't a concern)
Keep in mind that one of the easiest ways to find a name is to add numbers to the name. "Ruby" is very likely taken, but maybe "Ruby1066" isn't.
Some blogs even make up words that slightly relate to the site's content.
Gizmodo - an electronics and gadgets blog
TheSartorialist - a high fashion photo site
Waiterrant - a collection of restaurant anecdotes from a waiter
Caution! Combining words or a phrase may have an unexpected meaning when it's viewed as a single word. Take, for example, the phrase "the pen is mightier than the sword." If you wanted to turn that into the name of your blog, it would be a very poor choice because it raises expectations about the site's content.
To see how a possible blog name looks when it's typed, Google names before definitively deciding on one. Avoid possible misunderstandings about content or purpose, and avoid trademarks and copyrights.
The most important thing is to pick a name you enjoy and that reflects what you want your blog to represent.