Sunday, September 24, 2006

Changing Blog Appearances: Part 2

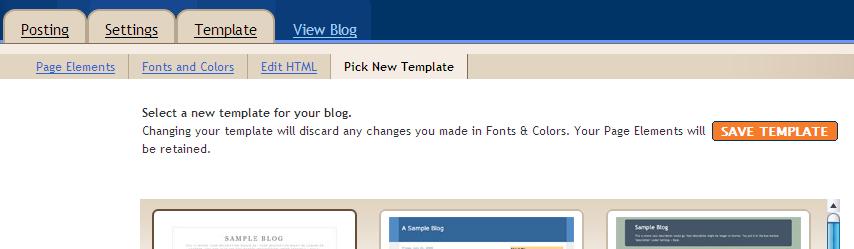
9. If you want to make a change in the way your blog looks, there are a number of preset layouts available. Choose one of these now, if you'd like, and then save.
Now click on the Fonts and Colors link.


10. This step of personalizing the blog is probably the most fun, because the results are instant, and can be undone easily with the Clear Edits option. There's also the "Revert to template default" option.

If you want to view your results in a different window or tab (depending on your browser), click the Pop-Out option. I've found it easiest to keep the changes in one window, so that it's instantly visible.

On the left part of the screen, there's a sliding menu which will list different parts of the page and allow you to customize each piece of the page. If you're unsure what a particular part is, pick a color that is distinctive and doesn't appear anywhere else on your blog, say a deep red, and observe what turns red. Then select the color that you prefer, once you know what's being changed. You can select from the boxes of colors on the far right, enter in a color hex code, or let Blogger suggest colors in the bottom row of "colors that match your blog." Color hex codes (or HTML color codes) are a standardized way to represent colors so machines can understand. Colors are assigned a value (with FFFFFF being white and 000000 being black) In a program, color is expressed in a combination of letters, numbers, or both. Computer monitors might display colors slightly differently - think of a store's display of tvs and all of the variations in color and brightness - but they're the same standard color. Searching for "color hex codes" or "html color codes" will provide you with many results.
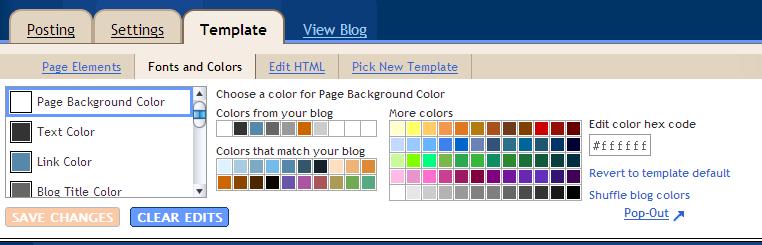
Blogger will suggest colors that match what you've already selected in the bottom row with the "colors that match your blog" box. If you're feeling adventurous, there's an option to randomly shuffle colors right above the Pop-In/Pop-Out link.

There are excellent pages dealing with hex codes and a more in-depth explanation of why #FFFFFF is shown as white. This page deals with the emotional impact of colors, which might be interesting to read. If you have difficulties determining complementary color schemes, this is a collection of color sites. Just for fun, this site allows you to pick a color and then see Flickr photos that match your color choice.


11. The Template | Edit HTML menu should only be used to make a backup of your template once you've happy with the colors that you've selected, or you're familiar with HTML. It's not a bad idea to have a copy of the template that you're using on your computer though. Just remember where you saved it.

Changing Blog Appearances: Part 1

By now, you're undoubtedly familiar with the controls, how to post, and how to upload pictures. Perhaps, you're too familiar and are starting to get bored with the way your blog looks. This posting will cover changing the appearance of your blog including colors and layout.

1. This image of the dashboard should also be familiar. You'll want to click on the Layout link.


2. This too should look familiar. Now, you're going to work with the Template menu tab. The Template | Page Elements tab is the first one to click.


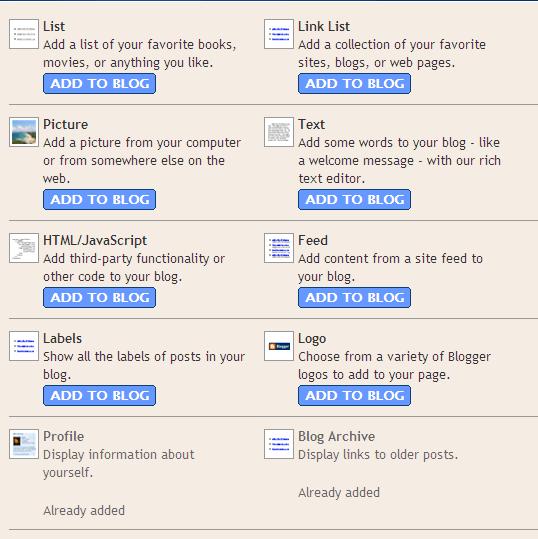
3. Each of the boxed sections represents a page element. Feel free to rearrange by dragging and dropping. If you click on Add Page Element, you'll see a menu of different options, with possible ideas for their use.


4. Of the options available, I've used only two standard options, and those are noted underneath with "already added." My profile is labeled "About Me."

The Add a Page Element links are identical, with this same menu, and differ only in placement on the page.


5. Anything you've clicked in the "Add or Arrange Page Elements" menu should bring up a new window or tab, allowing you to return to that menu. From there, click on the title of your blog (shown as Blog Inspirations, Ideas & Info) on the example to bring up this window. This is your opportunity to change or update your description of the blog, and this menu option is identical to the Settings | Basic tab from the very first post.


6. Back at the Page Element menu, clicking on the Navbar box will allow you to change the color of the heading with the Blogger logo to match your background.


7. This menu is the result of clicking on the Blog Posts box in the Page Element menu. Now that your blog's active, you'll have a better sense of how things are displayed, a chance to develop likes and dislikes about the way it's configured. If many of these options look familiar, they're also found on the Settings tab.


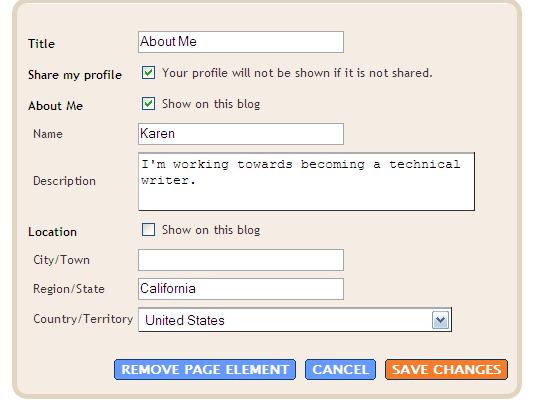
8. Clicking on the About Me box will allow you to reconfigure your profile.


Now that you've had a chance to adjust your content and how elements are arranged, it's time to have fun with colors. Click on the Template | Fonts & Colors tab.

Sunday, September 17, 2006

Integrating Flickr: Part 3

Once you've uploaded a few photos and decided on your settings, it's time to test out Flickr's newly integrated capabilities.

On your Flickr account, click Home in the upper lefthand corner to get to Flickr's main menu. Underneath the link "Your Photos", thumbnails of your recently uploaded pictures will be displayed. Click on one of them to begin.

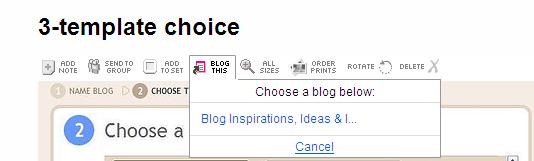
16. The photo 3-Template Choice is also from a previous posting that I've uploaded. Note the light grey menu options below the title of the photo. There are many options on the right of the photo, but we'll stay with the basics. One term that Flickr uses frequently is "photostream" and they mean your collection of uploaded images. You can use the arrow keys saying More to view other pictures you've uploaded.


17. Clicking on the Blog This menu brings up a box where every blog that you've integrated is listed. If you only have one blog associated with Flickr, click on that one.


18. This screen allows you to create your blog posting from inside Flickr's site. I chose Trial for the title and stated "This would be a good time to experiment." in the body of my posting. This way of composing blog entries is almost identical to the Compose menu on Blogger, but without a few formatting options.


19. Once you've finished your post and submitted it, this is what you'll see. Clicking on the "visit your blog" link will bring up another window with your newest entry in it (you're already logged in through Flickr), or you can return to create more postings with other photos.


20. Here's how my trial posting looks. (Note that it will display your Flickr username.)

Integrating Flickr: Part 2

Now, we'll link your Flickr account with your Blogger account.

Both Flickr and Blogger have helpfiles for this slightly complicated process.

You'll want to click here to start integrating the two, and there's also a link from the Flickr sitemap under the Blogs heading.

7. This is the first step. Click on the link once you've read the introduction above it.


8. Use the pulldown menu to display that you want to add a Blogger beta blog. This is a crucial step, then click Next.


9. Click on the "head over to Google" link.


10. You'll want to grant access by pressing the button.


11. Your blog info will be autofilled once you've logged in with your Google account/Gmail address/Blogger beta information. Confused? Don't be. It's all the same username and password.


12. You'll see the congratulatory message that your Blogger blog has now been added to Flickr. Return to Flickr's blogs page.


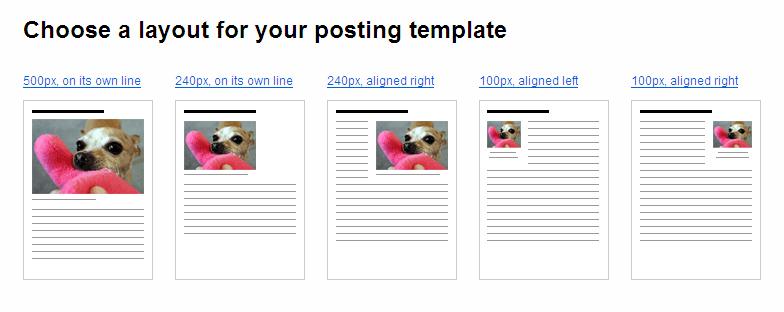
13. Now, you'll be able to select the way that you want your photos to display in Blogger. There may be slight variations as both programs are in the beta phase, but this is a fairly reliable representation.


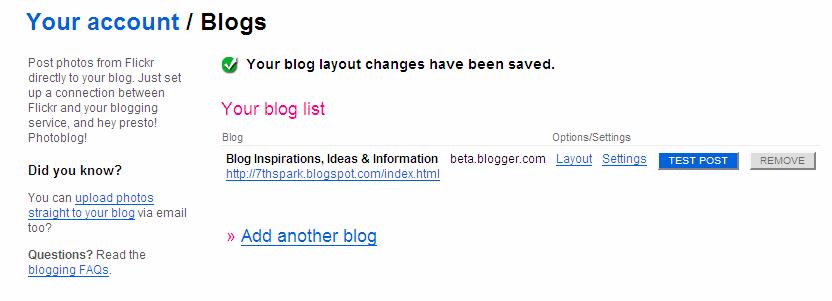
14. Now that your changes have been saved, you'll have the option of making more changes. I'd advise clicking on the Test Post button and heading back to Blogger to confirm that the two services are communicating with each other.


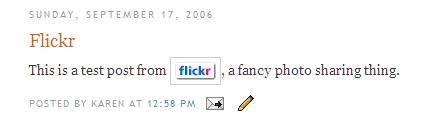
15. Here's what the test post looks like as you'll discover. You can delete this from the Posting | Edit Posts menu.

Integrating Flickr: Part 1

Good news! Blogger's image uploading has been vastly improved - the response times are much faster, and the sporadic errors have become less frequent. Now that it's easy to use the image uploading, it's time to move to another method - also in beta.

Flickr is a very popular website allowing users to upload their own photos and to browse other photos. It's recently been updated to allow compatibility with beta-version Bloggers.

To use Flickr, you'll need a Yahoo email account since Flickr was acquired by Yahoo! a year ago. It's also helpful to log into your Blogger account and have it open in another browser window while you're working with Flickr. This will make it easy for you to go back and forth between the programs.

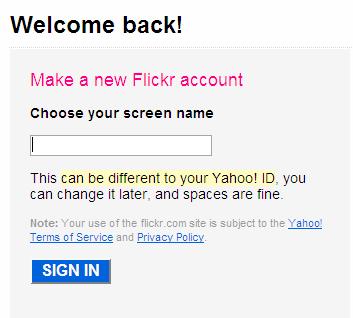
1. To begin, go to Flickr's website and click the sign up link. Once you've entered your Yahoo! information, you'll see this screen. (Note: it's welcoming you back to Yahoo, not Flickr).

You'll pick a screen name to use on Flickr here, but it does not have to be the same as your Yahoo name if you're concerned about privacy, and you can change your username later.


2. Here's the welcome screen. You'll want to get everything set up to integrate your blog and Flickr before exploring the site since Flickr can be somewhat confusing to navigate.

Click on the Upload 1st Photo Link.


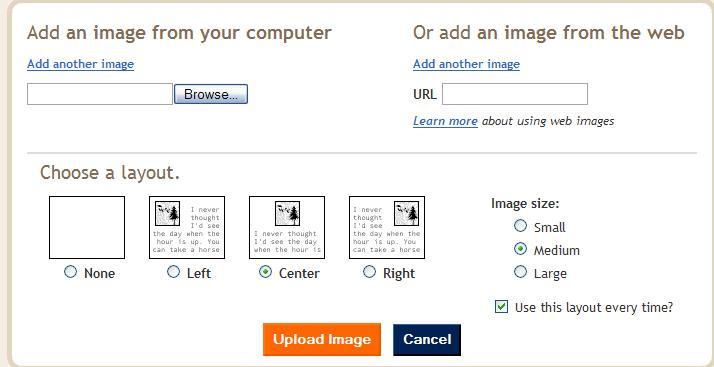
3. Flickr uses the same forms to upload your photos as Blogger does. Use the browse button to find your images.


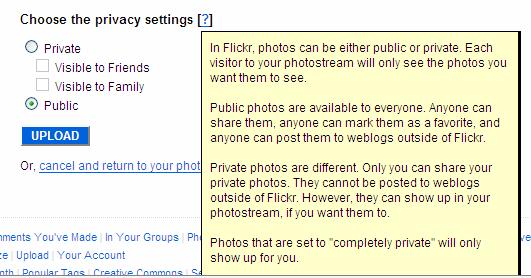
4. You can add the same tag to every picture that you're uploading so if you have 5 pictures taken on your ski trip to Aspen, you can tag them all with "Aspen." Clicking on the blue question mark will display a help box as the picture below shows.

Your privacy settings are up to you to determine who can view your photos. The help box refers to a "completely private" setting which is what happens if you select the "private" button without selecting the "visible to friends" or "visible to family" settings.

Once you've selected the photos, tagged them if you want, and have determined the privacy setting, hit the Upload button.


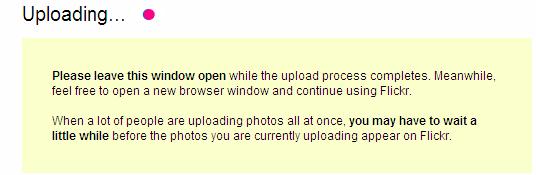
5. You'll be instructed to leave that window open. The first time that I tried to upload pictures, I received an error message and had to browse and select my photos again. Don't be discouraged if this happens! Go back and upload your photos again.


6. Once you've successfully added your photos to Flickr, you'll be asked to describe your photos. I chose to upload a picture from an earlier posting showing the bottom toolbar of Picasa. The title autofills with the name of the file. You can add your own notes to the photo which will display when that photo is selected. This is a good opportunity to record memorable things about the image such as: the date it was taken or any funny stories associated with the picture (such as Uncle Bob doing the splits inadvertantly on his skiis).

If you uploaded a batch of photos with the same tag, it will appear here. You can now add additional tags for each photo. It helps to come up with unique but memorable nouns like "skiis" or "funny" to help you sort through photos later if you plan to upload many photos to Flickr.


Go ahead and upload as many pictures as you'd like now.

Sunday, September 10, 2006

Working with Images: Part 3

Uploading photos using Blogger

13. Once you're logged into your blog (make sure to choose the beta version, or you'll receive an error saying that your username doesn't exist), and move to the Posting | Create Screen. The little icon of a picture is what you'll want to click, which takes you to the uploading menu.


14. From the upload menu, you'll want to click on the Browse button beneath the heading of Add an image from your computer. You can upload images from the web, but issues of bandwidth, copyrights, and broken links will become issues. These will be discussed in a later posting. It's easiest to upload files from your computer from now.

Once you've hit browse, Windows Explorer will pop up and you can determine where the image is located. (If you're unable to locate a particular image, bring up Picasa, find the file on Picasa, and right click when the picture is in the picture display window. A menu will show up where you can select "Locate on Disk." This will bring up Windows Explorer showing you exactly where the file is located.)

Once you've selected the file, you can determine how you want the picture to be displayed on your blog. Blogger's examples show how the text and the pictures will interact. The image size option refers to how large the picture will look on your blog, and will not change the actual image. The checkbox allows you to maintain a consistent look to your blog, if you choose.

Once you've finished those steps, click on the Upload Image button and wait. You'll be redirected to a new screen which shows the progress of your upload. You'll receive a confirmation scren which shows that your photos are added, and this will display a preview of the image. Click done, and it will take you back to the Posting | Create screen.


If you're on the Edit Html tab, you will see lots of odd formatting. Be careful not to erase any of this. HTML tags, which are all of the brackets "<" and "/>" need to be balanced and symmetrical. Every start bracket "<" needs an end "/>" to determine when the special formatting stops. If you erase one, your page will display errors. If you're new to HTML, it's easiest to use the Compose tab. Then, you can treat this post like any other text-only post.
If you're going to add multiple photos, remember that blogs work with reverse chronology. If you have three pictures, you'd want to upload the third picture first, then the second, and the first.

Working with Images: Part 2

We'll break down the main window of Picasa in parts, starting from the top down. Unfortunately, every button and setting can't be explained here, but Google has excellent helpfiles.

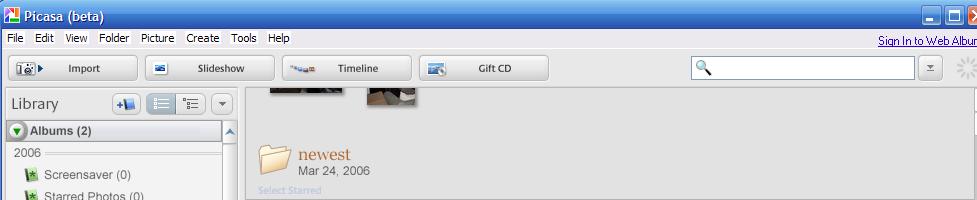
8. This is the top row of Picasa. It's a beta version, which means that it's apt to have quirks and unexpected "features." The row of toolbar links are laid out in a standard way, and offer different options for working with your images.

The Import button allows you to add more photos to Picasa, and will guide you through that process, whether you've saved photos on your computer or are using a flash drive.

Slideshow offers you a way to see your currently selected folder in a large format. It displays the contents of that folder as large images on your screen with controls provided at the bottom.

Timeline displays your pictures by the dates associated with them, and not always the date that you added it to Picasa. If you have a picture from 2003, but added it yesterday, Picasa shows that picture as being in 2003.

There is a search feature with a truly neat option. To the right of the search box, there is a tab with a pulldown menu. If you click that tab, you can use a sliding bar to find pictures that you've added. If you're searching for a particular picture and know about when you added it, you can view everything added in that time range. Exit Search will take you back to the main window.


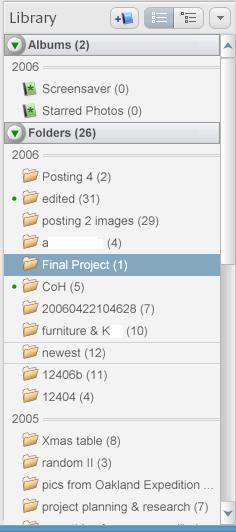
9. The left folder row is your main navigation guide. If you hover the mouse over each of the buttons, it will provide a mini-explanation of what each does. You can see that the folders are broken down by year, and display the number of pictures in each folder. To open a folder, click on it and it will be displayed in the main window. From there, you can select a particular image to work with, or organize your folders. Doubleclicking on a folder in the folder list will bring up a menu to enter more information about that folder.


10. This is a sample of what the picture display window will contain. The photographs are thumbnails, organized by folder. The date beneath the folder tells you when that folder was created. If you click on the folder, it will bring up Windows Explorer where you can edit your files. (Please note that Windows Explorer is different from Internet Explorer.) If you hover the mouse over the words "Add a description," you'll see it change to a bracket. Click once, and you can describe the folder's contents.


11. This is the bottom toolbar. To the far left is the photo tray. You can drag and drop photos there, and if you select a photo on the main screen, it will automatically be added to the photo tray.

The top of the toolbar contains the number of photos in the folder selected, its creation date, and how much disk space it occupies. You can tell which folder is selected by looking at the left folder row. The selected folder will have a band of color across it on the list of folders.

The bottom buttons (Hold, Clear, and Add To) contain options for working with the photo tray.

The orange BlogThis! button is where you'd be able to sign into Blogger and upload your photos directly. Hopefully this issue will be resolved quickly.

Collage is a fun effect which allows you to combine several of your photos that you've placed in the photo tray.

The slider to the far right allows you to zoom in and out of the main window, and if you have a single photo selected, of that single picture.


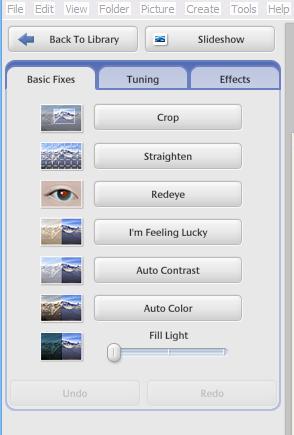
12. Doubleclick on a photo in the main picture display window to select it. The options for fixing, tuning, and creating effects are displayed in tabs to the left of the photo. Be adventurous with these settings, and see how fun it can be to alter the look of a photograph. Ctrl+Z will allow you to undo the settings or effects, as will the Undo button on the bottom of the tab. If you're concerned about permanently altering a photo, email the original photo to your Gmail account where it can remain safe while you experiment.

A set of arrows will let you move between other photos in that folder, and the Back to Library arrow will return you to the main window.